

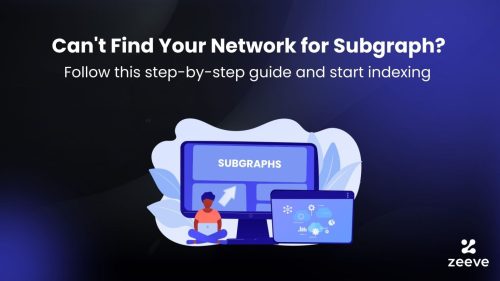
How to deploy Subgraphs on Zeeve? Step-by-Step Guide
Subgraph from The Graph Network tackles all the challenges of a traditional API-based data query method. Problems are mainly slow response, limited query, and complexity of managing multiple APIs.
Now with Hosted Subgraph, projects can easily set up their own blockchain data indexing solution and query data endlessly. Again, you may come across challenges while launching and managing your Subgraphs, such as downtime, slow indexing, less control over Subgraph infrastructure, and no direct support. To provide a solution, Zeeve is offering a reliable, enterprise-grade Subgraph-managed infrastructure that allows all kinds of web3 applications and networks to easily deploy their Subgraph and query data.
This article explains the step-by-step process of how you can deploy Subgraphs on Zeeve. Also, we will be briefing the Subgraph creation process and additional features supported on Zeeve, which are effortless Subgraph migration and Webhooks integration. Before that, let’s quickly understand why Zeeve-managed Subgraphs can be a viable solution for data consumers.

What makes Zeeve-managed Subgraph an ideal choice for dApps?
- Webhooks for real-time data indexing: Enable Webhooks in your Subgraphs to keep a track of real-time data changes into all the entities you specify. Webhooks works with Subgraphs simultaneously, allowing you to fetch both real-time and indexed data with ease.
- Ultrafast data indexing with zero downtime: Zeeve’s Subgraph infrastructure is optimized to serve upto 4-5x faster data indexing with minimal data lag.
- Support for diverse blockchains: Zeeve supports Subgraph creation for a range of blockchains, even the ones which are not supported for The Graph decentralized and hosted service.
- Hassle-free, low-cost infrastructure maintenance: With Zeeve, you get a highly-optimized and production-ready infrastructure to deploy your Subgraphs at significantly lower cost, and in a hassle-free way.
- Guaranteed reliability: Zeeve guaranteed reliability for Subgraph service with 99.9% API SLA uptime.
- Effortless Subgraph migration: Migrate your existing Subgraphs in one-click on Zeeve-managed infrastructure.
- 24/7 monitoring and logs: All your Subgraphs deployed on Zeeve will be monitored 24/7 and logs will be presented on the dashboard itself, ensuring performance and uptime.
Build and deploy your Subgraph with Zeeve: The hassle-free, Low-code way
As you might already know, there are multiple ways to build and deploy Subgraphs. For example,
- You can build a Subgraph from source code,
- Deploy Subgraph to The Graph’s hosted service, or
- Choose the low-code option available with Zeeve.
For this article, we will discuss the most relevant way– the low-code option, now available on Zeeve. Also, note that the hosted service at The Graph Network is in the process of sunsetting and it will be unavailable soon except for the networks that are not yet supported on Graph’s decentralized network. Note that there can be two main instances to deploy a Subgraph.
Here, there can be two scenarios– either you need to deploy a Subgraph from scratch or migrate from Graph Hosted service to managed services provider like Zeeve. We will discuss both the requirements in this article:
- Building and deploying a Subgraph from Scratch:
To deploy your Subgraph on Zeeve, you first need to create your Subgraph through the step-by-step mentioned below. However, if you want, Zeeve will build a custom-fitted Subgraph for your dApps or any web3 project.
What you’ll need:
>Access to Zeeve. (sign up and create your account)
>Graph CLI Installed.
>A properly compiled:
- Subgraph Manifest
- GraphQL Schema
- Assembly Script Mappings.
>The contract address for which indexing.
>ABI (Application Binary Interface) files for the contract.
A video walkthrough:
With all the prerequisites, let’s start the Subgraph creation:
- Install Graph CLI:
With yarn:
yarn global add @graphprotocol/graph-cliWith npm:
npm install -g @graphprotocol/graph-cli- Create your Subgraph:
Initiate a new Subgraph using the below command, plus adding a relevant Subgraph slug. For example, we are adding– “my-new-subgraph”
graph init --studio my-new-subgraphOr, you can create a Subgraph that will index data from an existing contract. Use the below command with your own Subgraph-specific details.
graph init
  --product subgraph-studio
  --from-contract 0x123abc456def789ghi
  --network ethereum
  --abi my-contract.abi
  my-new-subgraph
The <SUBGRAPH_SLUG> ( my-new-subgraph in this case)is the ID of your subgraph in Subgraph Studio, it can be found on your subgraph details page.
- Modify your existing Subgraph to add new data sources
Since v0.31.0 the graph-cli supports adding new dataSources to an existing subgraph through the graph add command.
graph add <address> [<subgraph-manifest default: "./subgraph.yaml">]

Options:

      --abi <path>              Path to the contract ABI (default: download from Etherscan)
      --contract-name           Name of the contract (default: Contract)
      --merge-entities          Whether to merge entities with the same name (default: false)
      --network-file <path>     Networks config file path (default: "./networks.json")
The add command will fetch ABI from Etherscan (unless you specify the –abi file. Plus, it will create a new dataSource for your Subgraph similar to how the graph init command creates dataSource –from-contract.
- Write your Subgraph manifest.
The subgraph manifest– subgraph.yaml file will define which smart contract your Subgraph will index, the events, and the way of mapping event data to the entities. Below is an example manifest, you can add specifications based on your Subgraph.
specVersion: 0.0.4
description: Swap Data for Ethereum Subgraph
repository: https://github.com/your-username/swap-data-ethereum
schema:
  file: ./schema.graphql
indexerHints:
  prune: auto
dataSources:
  - kind: ethereum/contract
    name: SwapContract
    network: mainnet
    source:
      address: '0x12aBc34De56Ef78GhI90jKlMnOpQrStUvWxYz'
      abi: SwapContract
      startBlock: 5000000
      endBlock: 6000000
    mapping:
      kind: ethereum/events
      apiVersion: 0.0.6
      language: wasm/assemblyscript
      entities:
        - Swap
      abis:
        - name: SwapContract
          file: ./abis/SwapContract.json
      eventHandlers:
        - event: SwapExecuted(uint256,address,address,uint256,uint256)
          handler: handleSwapExecuted
file: ./src/mapping.ts- Get the ABI Files
Following are the main ways to obtain ABI files. Ensure that your ABI file(s) must match the contract(s).
- If you are creating a new project, you can access the contract address and ABI right away.
- For public Subgraph projects, you can get ABI though truffle compile or solc compile.
- Additionally, you can use Etherscan or similar explorer to get the ABIs.
- Compile GraphQL Schema
GraphQL schema decides what data your Subgraph will store and how it will query data via GraphQL. Following is the schema for a single token entity. You can customize the schema as needed.
{
  token(id: "1") {
    id
    owner
  }
}- Define the Entities
Specify entity types in your schema.graphql, and your Subgraph will produce all the top level fields that query single instances and collections related to that entity type. The Swaps entity below is structured around a Swaps object and is a good example of how an entity should be defined.
type SwapsForEthereum @entity(binance: true) {
  id: Bytes!
  owner: Bytes
  displayName: String
  imageUrl: String
  accepted: Boolean
}
}
Now that your Subgraph is created, head to deployment on the Zeeve-managed Hosting Subgraph infrastructure. Following the step-by-step instructions:
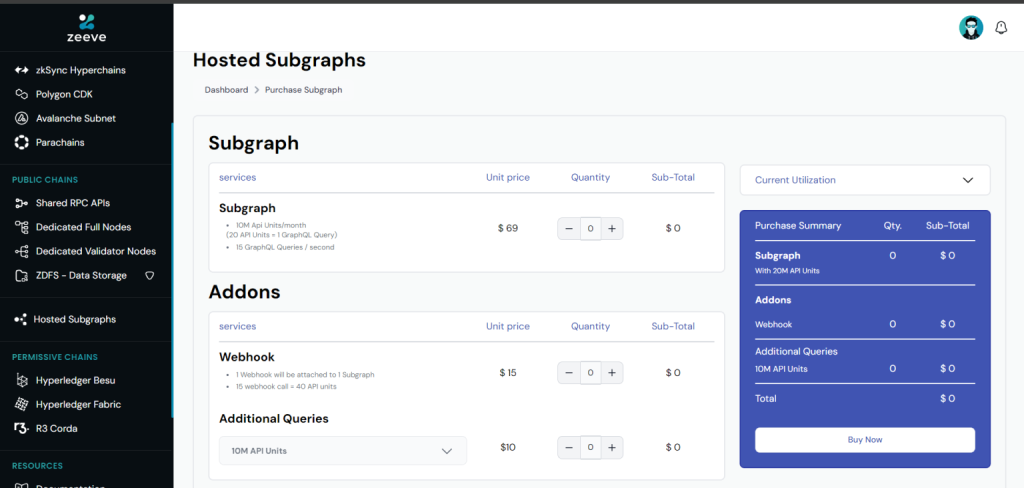
Step:1 Login or create an account on Zeeve. Navigate to the ‘Hosted Subgraphs’ located at the left-side panel of the dashboard. Buy a subscription for Subgraps(s)based on your project requirement. Also, you can go for services add-ons (that we will discuss later) and additional queries. Immediately after the payment is done, your subscription for Subgraph will be active. You can now proceed to deployment, hence.
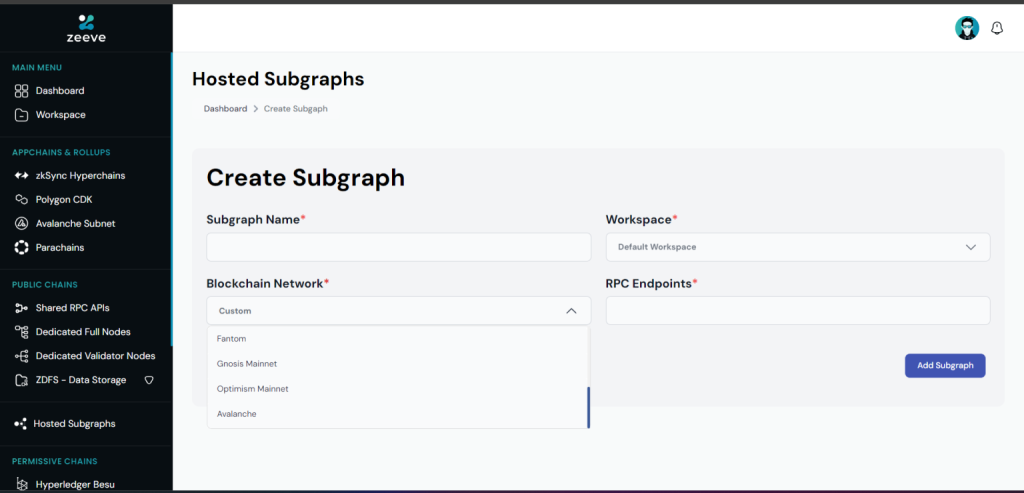
Step:2 Again, navigate to Hosted Service, click ‘Add Subgraph,’ and continue with Create New. Steps for importing your existing Subgraph will be discussed in a separate section in a while. Tapping on the Create New option, a new page will appear asking for basic details such as the name of your Subgraph, workspace, and the blockchain network from which you will fetch data through your Subgraph. Choose any network from the drop-down list or add your custom network by providing the respective RPC Endpoint.
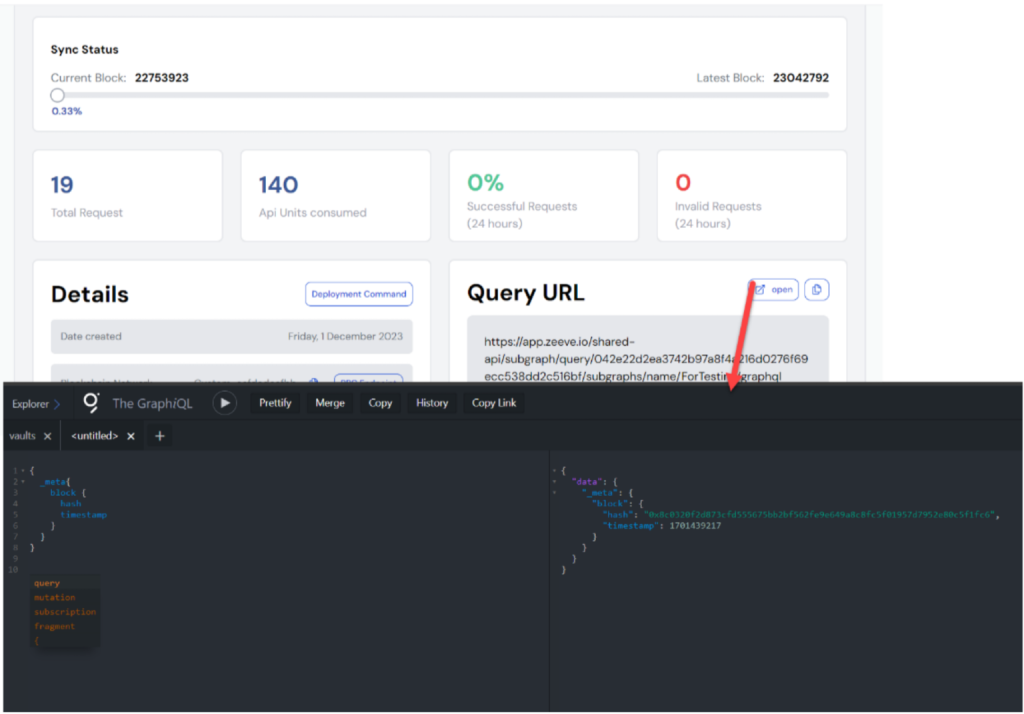
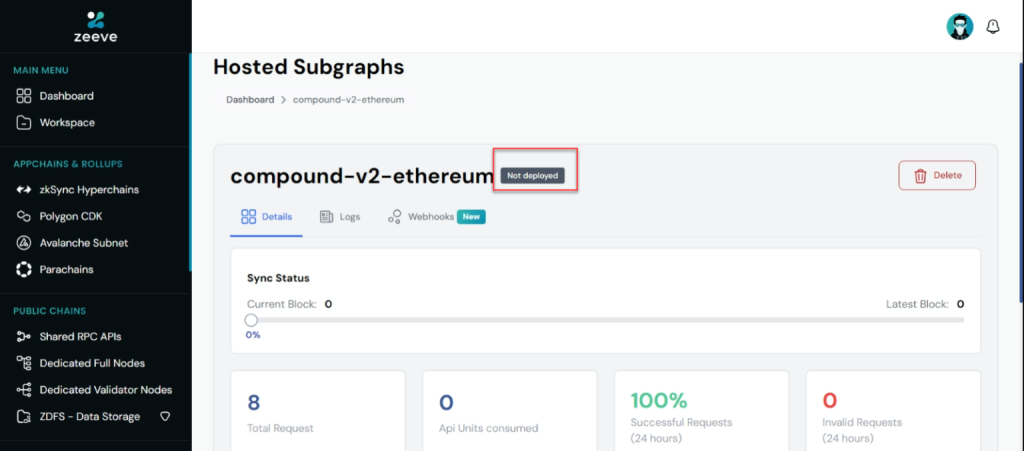
Step3: Click on ‘Add Subgraph’, and a quick authentication will take you to the Subgraph details page. Information on this details page includes details such as Subgraph status– deployed or in progress, sync status with current and latest block, total requests, API units consumed to date, successful requests, and invalid requests. Details specific to your Subgraph will be the creation date, selected blockchain network, and workspace type.
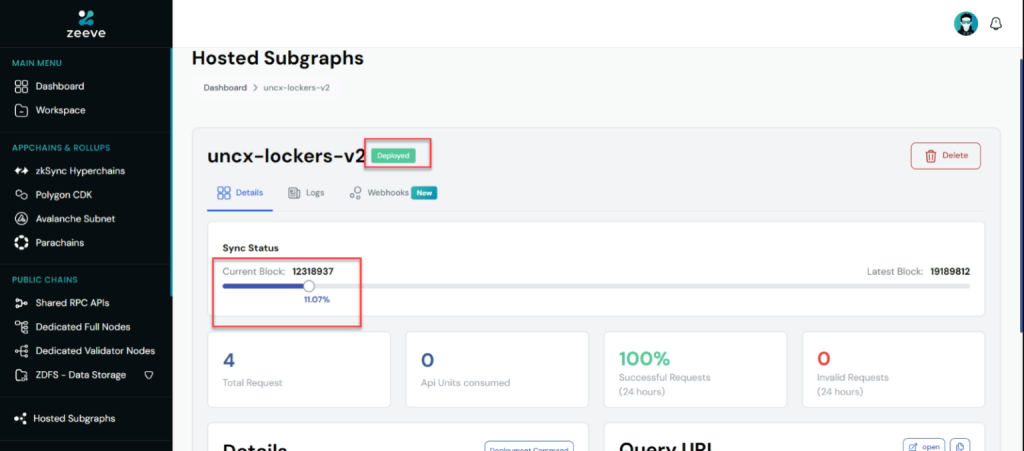
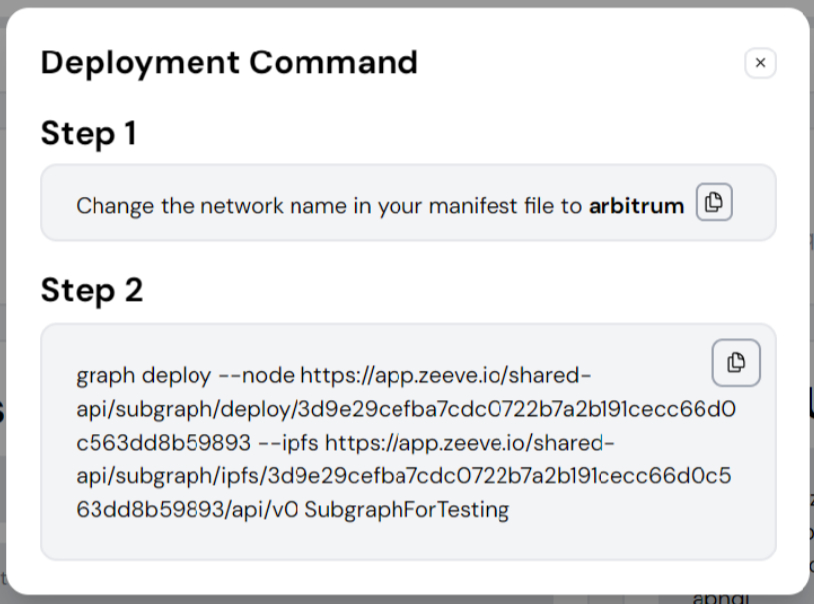
Also, you will get ‘Deployment Command’ and ‘Query URL’ on this same page. With this Deployment command, go to the CLI terminal and complete your Subgraph’s deployment.
Click on the Query URL to track all the successful requests on your Subgraph. These results are stored in a PostgreSQL database.
Step:4 Click on the Log button of any deployed subgraph to get real-time status information about the sync’s progress.

- Migrating from The Graph’s Hosted Service Subgraph to Zeeve Subgraph Infrastructure:
Zeeve allows you to import your existing Subgraphs to the Zeeve-managed infrastructure, be it from The Graph’s decentralized network or on the Graph’s hosted service. For that, you simply need to log in to Zeeve→navigate to Hosted Subgraphs—>click on ‘Import Existing.’ You will see a details page similar to the one below, asking for details such as Subgraph URL, Workspace, and Network.
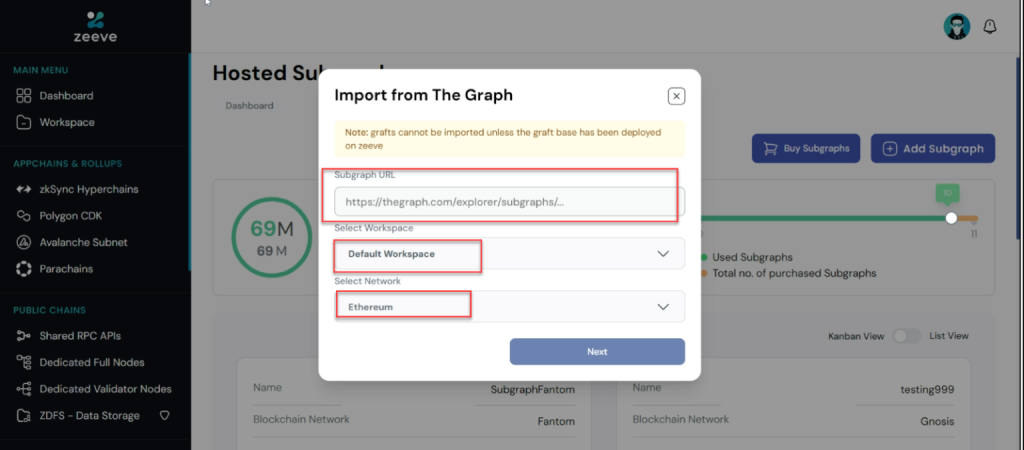
Once you provide all the details, click on next to verify your Subgraph-related details. Enter Submit and your Subgraph will successfully migrate to Zeeve infrastructure.
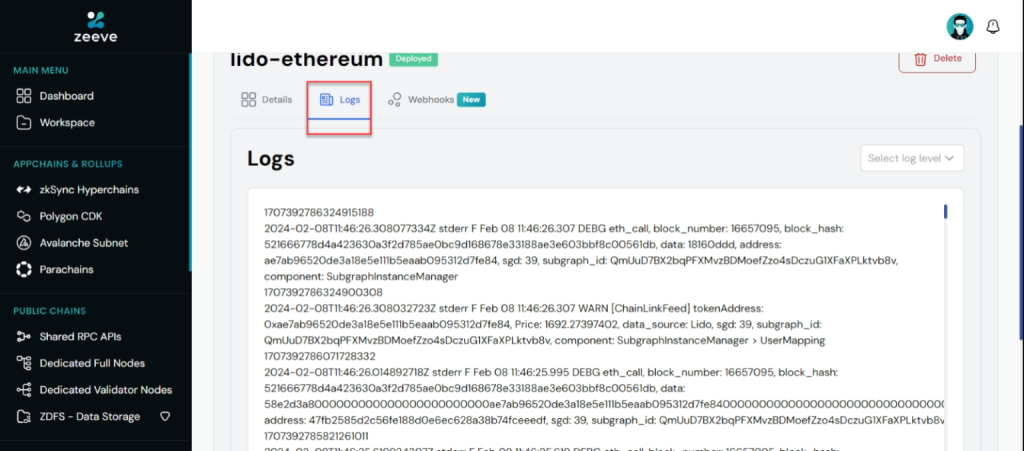
Similar to how Zeeve monitors your newly created Subgraphs, it will also check logs of your imported Subgraph. Go to the Subgraph details screen and check logs from there. Here’s an example:
Enable Webhook for your Subgraphs
Webhooks are like real-time watchers that trigger every entity change on Subgraph, maintaining flow of updated data for your application. Zeeve allows you to enable Webhooks both in your new Subgraph and your existing Subgraph that you import to the Zeeve infrastructure.
To enable Webhooks in your Subgraph, navigate to your Subgraph (deployed or under deployment), click on Webhooks, and then enable webhook.
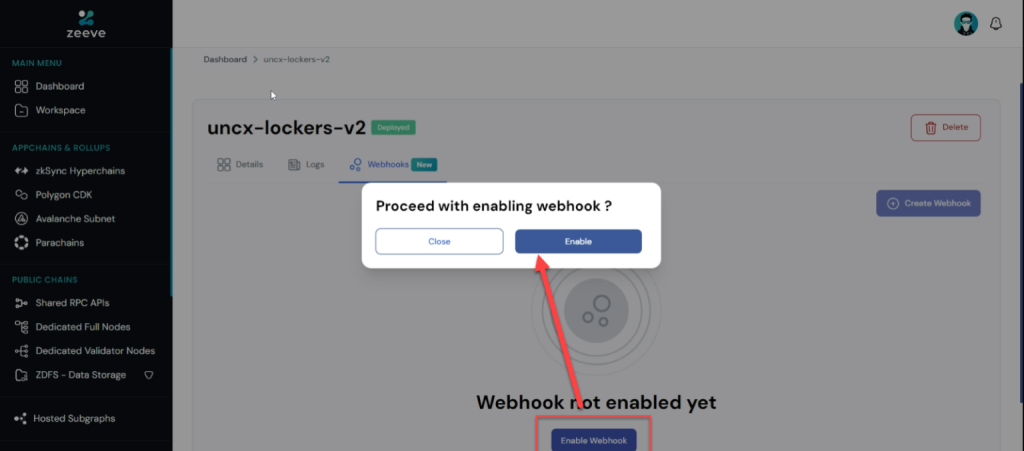
Provide details for the Webhook— entities and URL. Click on Continue to enable Webhook.
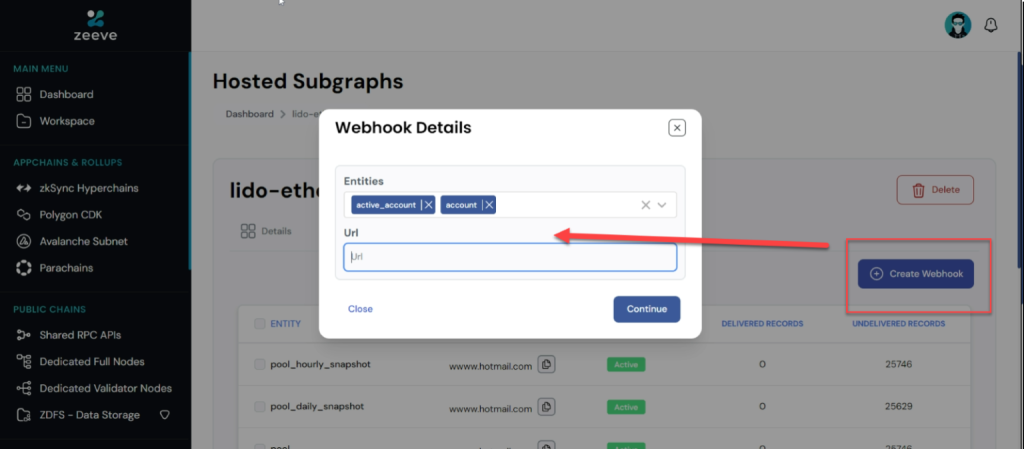
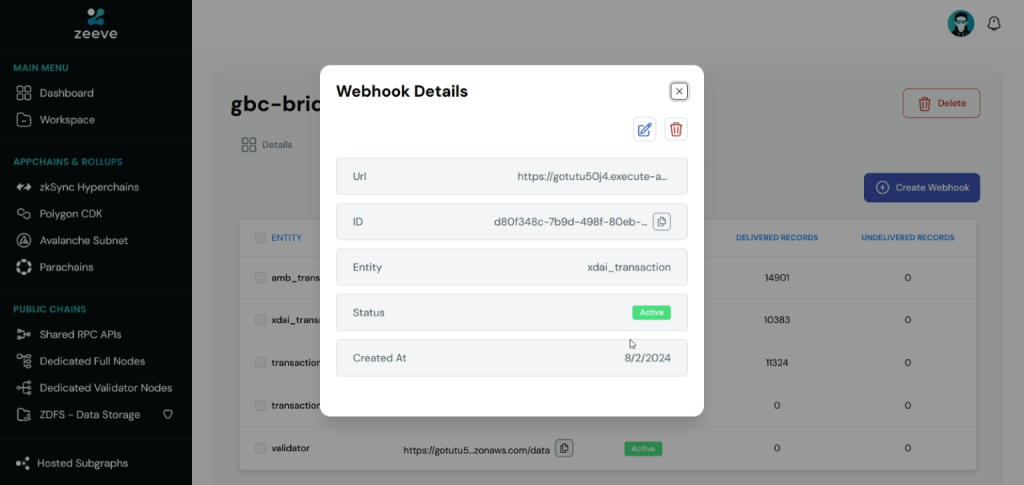
Now, you can track real-time data changes across all your specified entities in tabular form, shown in the below image:
Note: You first need to purchase Webhooks to be able to enable them into your Subgraphs.
Let’s Wrap!
That’s it! Our discussion around Subgraph deployment on Zeeve from scratch and migration of existing Subgraph, is done. Now that you know how to deploy Subgraphs on Zeeve, you can easily sign up and initiate your Subgraph creation. Additionally, Zeeve offers support of highly experienced web3 developers who will build your custom Subgraph at lower cost and in less time for faster time-to-market. For more information Zeeve-managed Subgraphs or to understand other rest of the blockchain services, feel free to connect with us. You can mail us your queries or schedule a one-on-one call for a dedicated discussion.
Responses